Testing WordPress Android App

Tags

, , ,

This is my first blog post using the WordPress Android App. So far, I can say it’s very easy to use and you can easily create a quick post for your blog when the only device you have on hand is your Android phone.

However, I’m missing a critical feature, which is the ability to edit the post in HTML view. Even when using the native web app, I usually catch myself tweaking the post in HTML. So, the lack of this ability in the mobile app affects the experience a little, but it’s not a deal breaker.

You can get more details about this app by visiting the WordPress for Android website or, if you’re ready to try it out, scan the code below with your Android device.

WordPress For Android Download

Google Accounts on Twitter

Tags

,

Over the weekend, the Google Blog team posted a list of Google accounts on Twitter. I had no idea Google had so many twitter accounts. If all other companies also posted some sort of directory of where we could find what is interesting to us about them, it would make it easier for us to be updated.

Some of the Google accounts listed are:

 For the complete list, check their blog post at Google Blog.

How To Use Custom Objects as Hashtable Keys Without Getting Duplicated Keys in Your Collection

Tags

, , , , ,

Have you ever faced an issue of having duplicated key objects in your Hashtable even though the objects represent the same entity? In this post I’ll show a way to circumvent the Hashtable behavior.

Sometimes we have a need to use objects as Hashtable keys instead of strings. At least for me, most of the time, Hashtables are used as standard dictionaries such as in the sample below:

Hashtable Sample with String Keys

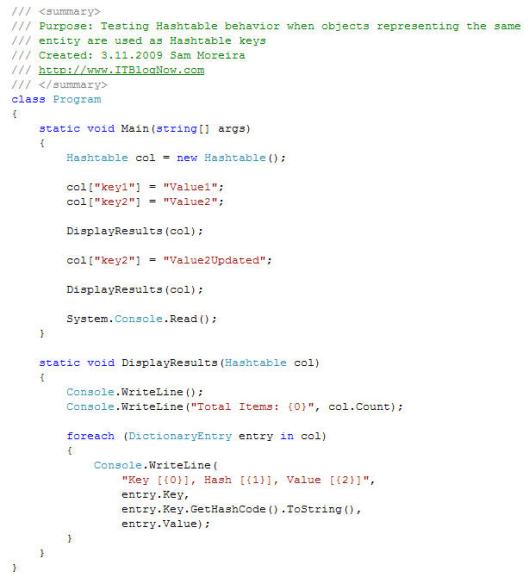
The code above produces the following outcome:

Hashtable with strings results

In the sample above, the value of “key2” key has been updated as expected. Also notice that the Hash value of key2 is the same on both DisplayResults() executions.

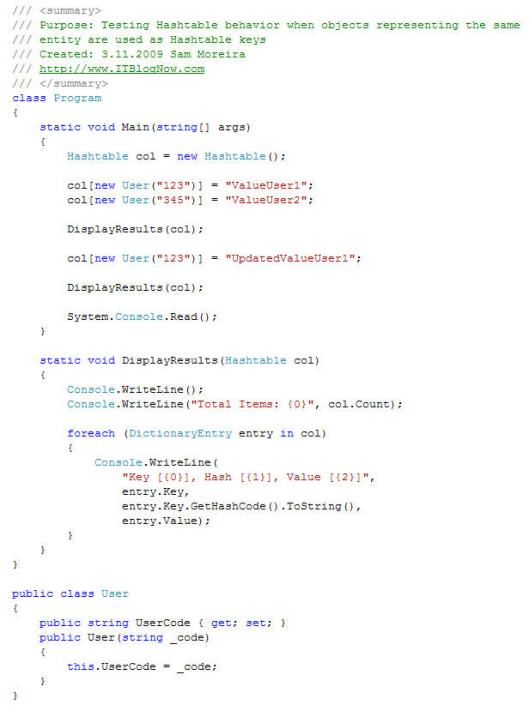
Now, what happens if instead of using a string as the key, we use an object? Here’s the updated code after we change the key from string to a custom object:

Hashtable class with Objects as keys

And here’s the outcome:

Hashtable with objects as keys results

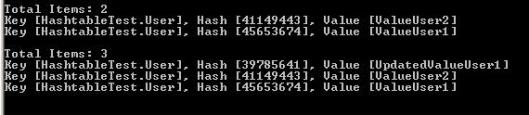
As you can see by the resulting outcome above, when I tried to update the instance of User 123, the Hashtable actually added the object as a new item to the collection and updated its value instead.

Why does this happen? Actually, the results of the second test are the ones we should expect when working with Hashtables as each newly created object receives a new hashcode value, and the Hashtable uses the hashcode value to search for keys in the collection. So, when the new user was created to update the value of the existing one, the new hashcode value given to the new object was used to search for an existing item in the collection; and as it could not be found, the object was added as a new item in the collection.

But, why doesn’t this happen with strings? They’re also objects, correct? String objects have a different behavior as they override object class methods to always consider equal two strings holding the same values even if they are actually different instances. On the first code sample, Let’s change the statement that updates the value of key2 to the following:

Hashtable Statement with string case changed

After running the program, we’ll get the following results:

Hashtable with different case strings used as keys

This result looks like the second test results when a custom object was used as the key; only at this time, we used a string. Why didn’t we get the same results as our first test? Notice that I have updated the “k” (lowercase) to “K” (uppercase) to make the values of each string object different. So, if you look at the resulting outcome, the “Key2” string has a different hashcode value than the “key2” one, what means that the overridden GetHashCode() string method didn’t come into play and the Hashtable behaved as it should.

Now that we have covered the basics, how do I make my custom object behave like the string object to prevent duplication of objects representing the same entity in my collection? Simple, we’ll have to update our User class to override two methods of the object class: GetHashCode() and Equals().

Here’s the new User class with the overridden methods:

Custom User class with overridden object methods

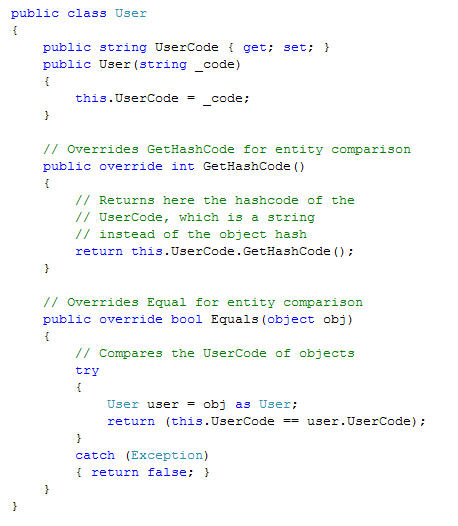
In case you’re lost, we’re doing two things here: first, we’re overriding the GetHashCode() method to return the hashcode of the UserCode property value (a string) instead of the hascode of the User instance itself. This way, two User instances with the same UserCode value will have the same hashcode value. And second, we’re overriding the Equals() method to use the value of the UserCode property for comparison; this way the class can identify whether or not two instances of the User class represent the same entity.

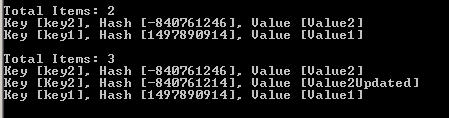
Here is the outcome of our program after the two object methods have been overridden:

User class with overridden methods results

It’s nice isn’t it? Now we can easily update the value part of User keys in the collection without worrying that duplicated User keys will be added to the collection.

Enjoy!

How to Monitor File System Changes in C#

Tags

, , , , , , ,

Have you ever needed to monitor a specific directory or file for changes? .Net Framework has a class called FileSystemWatcher within System.IO namespace that allows developers to take action when a specific event occurs in the File System. In this posting, I’ll show you how you can use the FileSystemWatcher class to monitor your files or directories.

For our sample, let’s use the following hypothetical scenario: your company hosts its own website and for months, without success, you have been asking content editors not to store their image files within the folder reserved for web pages only. So, you decide to monitor the folder and take action if any violation happens.

How do you get this done using FileSystemWatcher? In the code sample below, you will notice that you just need to create an instance of FileSystemWatcher, add event handlers for the events you want to monitor, and tell your object to watch for events. It’s that simple!

FileSystemWatcher Class Implementation

In the implementation of the Created event handler above, I am just checking for extensions of image files explicitly. The FileSystemWatcher has a property called “Filter”, which allows you to define a mask of the type of files to watch (“*.jpg”, “doc*.*”, etc), but I couldn’t get more than one file extension associated with this property (if you know of another way, let me know).

So, still in the implementation sample, if an image file is created or copied into the monitored folder, an e-mail is fired to alert of the violation and the file is automatically deleted from the folder. Also, just to play nice and prevent any problems if the only copy of the file is deleted, the e-mail will also have a copy of the file attached to it. Another option would be to automatically move the file to the correct directory instead of just deleting it; however, if you take that approach, you’ll also have to check for crashes on the filename, at minimum.

Besides the Created event illustrated in our sample, you can also monitor the File System for the following events: Changed, Deleted, and Renamed. In our sample, we could also have implemented the Renamed event handler to prevent a user from bypassing the monitoring system by copying an image into the folder without an extension and renaming it later. And finally, if you are also looking for events in subdirectories, you can just set the FileSystemWatcher.IncludeSubdirectories property to true.

One thing to keep in mind is that, I have used a Console Application just to illustrate the implementation of the FileSystemWatcher class. However, if you decide to implement something similar that should run constantly, instead of a Console Application, you’ll probably want to look into creating a Windows Service and get your monitoring application running in the background.

Have Fun!

How to Implement Automated Properties in C#

Tags

, , , ,

C# 3.0 and later versions give developers the ability to have underlying property structures automatically taken care by the compiler, which behind the scenes, creates the private members and implements the get and set inner workings. In this posting, I’ll cover how to create regular and automated properties in C#.

Before automated properties became available, the only way to create properties was to write code for each property we wanted to make available through our class. The snapshot below displays a Person class being consumed by the Program class. The Person class has three properties: FirstName, LastName, and DateOfBirth. In order to implement these properties in the correct encapsulated way, we needed three private members (declared at the top) that will only be accessible through the public properties.

autoproperty01

Now, let’s see what changes when using automated properties. After modifying the Person class above to use automated properties, we have the following code:

autoproperty02

The differences are clear. We basically replaced a regular block property declaration with a single line declaration by adding {get; set; } to the member declaration. The compiler will automatically create basic get and set blocks and the result will be transparent to other classes consuming your class. In addition to make it easier to create properties, we have also saved about 18 lines of code by switching just three properties to auto mode. Imagine not having to type several lines of code for classes requiring lots of properties.

You can also make one or more of your properties immutable by declaring the set accessor private. For instance, in our Person class, a Person might get married and need to change the Last Name, but the Date of Birth will never change. The code below displays how we can make DateOfBirth immutable using automated properties:

Immutable Property Implementation

As we can see from the snapshot above, we just needed to declare the set accessor as private during the member declaration to prevent users from changing property values once the object has been created. The downside of this approach is that a constructor needs to be implemented in order to populate the immutable property at the time the class is instantiated.

Have Fun!

Google Docs Now Has Cell Content Validation On Spreadsheets

Tags

, , , , , , ,

Wow! This is a feature I would like to have available on Excel, but until Microsoft wakes up, I’ll surely be giving Google Docs a try. Sometimes I have to create forms, in which some cells can only accept a certain type of data. When working on Excel to accomplish this goal, I usually can’t find a native way to validate the data without putting my VBA skills to work. (Note: as I’m not a heavy Excel user, let me know if I’m missing a feature already available in Excel).

Google has added a great feature to Google Spreadsheets, which allows users to determine which cells should match a specific data type. And there’s more; we can also decide whether invalid data will be automatically rejected or if just a warning will be given.

Here’s a quote from Google Blogoscoped about the new feature:

For instance, you can select a column which is supposed to contain email addresses only. Now pick Tools -> Data Validation from the menu. You’ll be offered to restrict the cell content to only certain types of numbers, texts, or dates. Each type contains further restrictions; for instance, a text may be set so it must contain a certain string, or be an email, or be a valid URL.

Thank you for this nice feature. Way to go Google!

Free Microsoft E-Learning Courses to Sharpen your IT Skills

Tags

, , , , , , , , , ,

If you’re short on money to spend on training or if you’re just looking for a good deal, check out Microsoft Learning. There you can find close to 50 free e-learning courses available on several categories. The majority of them are, of course, introductions and overviews of specific technologies, but there are also a few that could be used to sharpen your skills.

Below you can find a short list with some of the courses that are available for free through Microsoft Learning. For the complete list, click here:

  • Clinic 3402: ASP.NET for PHP Developers: Introduction to ASP.NET
  • Collection 5134: Developing Rich Experiences with Microsoft .NET Framework 3.0 and Visual Studio 2005
  • Clinic 5230: Developing Enhanced Web Experiences with Microsoft ASP.NET AJAX Extensions
  • Clinic 5939: Introducing Server Management in Windows Server 2008
  • Clinic 6189: What’s New in Microsoft SQL Server 2008 for Business Intelligence
  • Clinic 6190: What’s New in Microsoft SQL Server 2008 for Database Development
  • Course 6258: New Features Of Microsoft SQL Server 2008 Reporting Services
  • Collection 6261: Developing Rich Experiences using Microsoft .Net Framework 3.5 & Visual Studio 2008
  • Collection 6262: Introducing Windows Workflow Foundation using .Net Framework & Visual Studio 2008
  • Clinic 6263: Introducing Windows Presentation Foundation using .Net Framework 3.5 & Visual Studio 2008
  • Clinic 6264: Introducing Windows Communication Foundation using .Net Framework 3.5 & Visual Studio 2008
  • Clinic 6335: Exploring Microsoft Application Virtualization
  • Course 6339: Database Fundamentals in Microsoft SQL Server 2008
  • Collection 6340: Introducing Microsoft SQL Server Data Services for Developers
  • Clinic 6341: Overview of Microsoft SQL Server Data Services
  • Clinic 6342: Developing an Application for Microsoft SQL Server Data Services

Happy Learning!

How to Respond and Raise Events in .NET

Tags

, , , , ,

I was talking to a friend over the weekend and the “Events in .NET” subject came up. Basically, over the years working with .NET, he had created several applications that responded to .NET events, but he had never worked on the other side of the fence: raising the event itself. During the conversation, I’ve realized there’s a possibility that creating classes that raise events is not a common trait among most developers as .NET Framework is extensive enough to address most common issues. So, I’ve decided to create this post to address how to raise and respond to events in .NET.

Let’s start with raising the event on the class side. There are three main steps you need to take when raising an event for a specific situation:

  1. Define a delegate to hold the reference to the method that will respond to the event. The responding method will be specified by the application instantiating the class, not the class itself.
  2. Define an event member associated with your delegate to ensure your delegate will be executed when the event occurs.
  3. Raise the event when the specific situation occurs.

To make things clear, let’s use a simple but real-life example. Let’s suppose you have a Customer class that holds customer records. As using your class is the only way applications can remove customer records from the system, you have been asked to find a way to notify the applications using your class anytime a user tries to delete a customer record, allowing them to validate and log the request before it actually takes place. You can also give applications a way to abort the process if the request is not authorized.

Following the scenario above, let’s apply the three main steps to raise an event.

public class Customer
{
// Step 1. Define a delegate
public delegate void DeletingCustomerEventHandler(object sender, EventArgs e);

// Step 2. Define an event member associated with your delegate
public event DeletingCustomerEventHandler DeletingCustomer;

// Method that raises the event
public bool DeleteCustomer()
{
//Step 3. Raise the event (occurs before the action takes place)
EventArgs e = new EventArgs();
if(this.DeletingCustomer != null)
{
this.DeletingCustomer(this, e);
}

// Continue deleting customer …
}
}

Breaking down the code: In step 1 above, the first parameter of DeletingCustomerEventHandler will be the object raising the event, and for the second parameter, you can either use the default EventArgs class or create your own class based on EventArgs. You’ll usually create your own class if you need to pass any extra information to the method responding to the event. Step 2 defines the DeletingCustomer event, which will be automatically exposed to application developers using your class. And step 3 basically verifies whether or not a method has been assigned to your delegate and raises the event if the delegate is not null.

Now that we have covered how to raise an event, let’s complete the post by talking about the part most developers are familiar with: responding to the event.

In order to respond to an event, application developers must follow two main steps:

  1. Create a method to respond to the raised event; the method must match the delegate signature for the event.
  2. Add an event handler associating your method created in step 1 to the event being raised; this step basically does the magic and allows the event to be raised (see step 3 in the previous section).

Let’s dive into the sample code to respond to the DeletingCustomer event of the Customer class:

// Step 1. Create a method to respond to the event
private void ValidateDeleteRequest(object sender, EventArgs e)
{
// If necessary, cast object back to Customer type
Customer oCust = (Customer)(sender);

// Log Request
LogRequest(oCustomer, oCurrentUser);

// Validate Request
if (!FunctionToValidateDeletion(oCust))
{ // Cancel Operation if allowed by the class }
}

// Step 2. Add event handler when creating the object
Customer oCustomer = new Customer();
oCustomer.DeletingCustomer += new Customer.DeletingCustomerEventHandler(ValidateDeleteRequest);

This code to respond to the event is simple… in step 1 we create a method matching the delegate signature for the event handler. This method will be called anytime a customer record is about to be deleted from the system. So, within the method, application developers can validate and log details of the request for later use. If needed, you can also allow the application to cancel the process when the validation fails by creating a new class based on EventArgs class, in which you would expose a member to trigger the cancellation process.

And in step 2, we ensure that the event will be actually raised by adding the event handler and associating our method with it. If you remember step 3 from the raising an event section above, before raising the event, we must check whether or not a method has been associated with our delegate. The step 2 in this section takes care of this association.

That’s all for now. I hope I have been able to clarify a little bit about how you can raise and respond to events in .NET. As we can see, there’s no mystery in the process; it’s just a matter of understanding how each part fits together to accomplish the goal.

Happy coding!

US and UK Android Developers Get Support for Priced Applications On Android Market

Tags

, , , ,

Google will finally allow Android developers to charge for their applications distributed via Android Market. That was a great move from Google; the ability to charge for applications will not only allow current Android developers to get compensated for their hard work, but also make Android more attractive to new developers. As a result, end users, who own Android-based devices, can expect to see an increase in the number of applications offered by Android Market in the near future.

Priced applications will be available to end users in US starting next week. If you live in Germany, Austria, France, or Spain, priced applications will be available later in the quarter. And for other countries, an announcement will be made by the end of the first quarter of 2009.

Now, the most important part… how will Android developers get paid? According to Google, consumers and developers will have to use Google Checkout for all transactions processed via Android Market. So, if you are an Android developer and don’t have a Google Checkout merchant account, you’ll need to sign up for one before you’re able to sell your applications. 

If you’re wondering how much you’ll be able to charge for your applications, here’s the answer from Google: the cost of Android applications for end users must be in the following price range: $0.99 – $200 (USD) and 0.50 GBP – 100 GBP.

Two important notes if you already have a free application available to users on Android Market. First, if you are planning on charging for your application once it has already been offered for free, you’ll have to re-upload it as a priced application. And second, take a look at the following quote obtained from the section 3.3 of the Developer Distribution Agreement about a free upgrade requirement to end users:

“3.3 You may also choose to distribute Products for free. If the Product is free, you will not be charged a Transaction Fee. You may not collect future charges from yours for copies of the Products that those users were initially allowed to download for free…”

In other words, even if you decide to convert your free applicatin to a priced application, you’ll still be obligated to provide free upgrades to end users who have installed the free version of your application prior to the switch.

After this initiative, I can wait to see how far Android will take Google. What about you?

Why Not Move Your Files to the Cloud with Microsoft Office Live Workspace?

Tags

, , , , , , ,

Tired of copying files to a flash drive or send them to your e-mail account every time you have to work on a different computer? Why not give Microsoft Office Live Workspace a try? It’s free and allows you to access your files from anywhere.

When I started using Office Live Workspace a while ago, I had no option but using the web interface to upload or download my documents before being able to actually work on them. But now, there’s a plugin for Microsoft Office Word, Excel, and Powerpoint that allows me to open and save documents directly from the Office applications installed in my computer, without having to access the web interface on my browser. After the plugin is installed, you’ll actually get two new menu options on Office 2007, called “Open from Office Live” and “Save to Office Live”, and a new toolbar called “Go to Office Live” on Office XP and 2003, containing the Open and Save buttons.

Nothing changes about the way you work with your files; basically, you will just be using the cloud, instead of your local computer, to save and retrieve your documents, and the process is completely transparent to you; it’s like having a second drive installed on your computer to save your documents. And the good thing is… if you also have the plugin installed on your work computer, you can easily, from work, open any document saved to the cloud through your home computer, and vice-versa.

That’s not all, if you’re also interested on collaboration, you can use MS Office Live Workspace to share documents with anyone you want. You can easily define, at the document level, who on your sharing list is allowed to edit the document and who is only allowed to view it. Also, once you share a document, providing the email address of the people you’re sharing the document with, Office Live Workspace automatically sends them an e-mail, inviting them to view or edit the document.

It sounds cool, doesn’t it? I know it helps me a lot when I’m working on a document and I have to jump from one location to another.